OpenTelemetry Phoenix monitoring
Learn how to instrument your Phoenix application with OpenTelemetry to trace HTTP requests, LiveView interactions, and Ecto database queries.
What is Phoenix?
Phoenix is a web framework for Elixir that provides a productive, reliable foundation for building web applications. It uses the Cowboy or Bandit HTTP server and integrates with Ecto for database access.
Key features of Phoenix include:
- Real-time communication with Channels and LiveView
- High performance built on the Erlang VM (BEAM)
- Fault tolerance through process supervision trees
- LiveView for server-rendered interactive UIs without JavaScript
- Ecto integration for database access with query tracing
What is OpenTelemetry?
OpenTelemetry is an open-source observability framework that aims to standardize and simplify the collection, processing, and export of telemetry data from applications and systems.
OpenTelemetry supports multiple programming languages and platforms, making it suitable for a wide range of applications and environments.
OpenTelemetry enables developers to instrument their code and collect telemetry data, which can then be exported to various OpenTelemetry backends or observability platforms for analysis and visualization. The OpenTelemetry Collector can be deployed as a sidecar or standalone service to efficiently collect and process telemetry data from your Phoenix applications.
Installation
Add the required dependencies to your mix.exs file:
defp deps do
  [
    # OpenTelemetry core
    {:opentelemetry, "~> 1.5"},
    {:opentelemetry_api, "~> 1.4"},
    {:opentelemetry_exporter, "~> 1.8"},

    # Phoenix instrumentation
    {:opentelemetry_phoenix, "~> 2.0"},

    # HTTP server instrumentation (choose one)
    {:opentelemetry_cowboy, "~> 1.0"},
    # {:opentelemetry_bandit, "~> 0.2"},

    # Ecto instrumentation
    {:opentelemetry_ecto, "~> 1.2"},
  ]
end
You need both opentelemetry_phoenix and one of the HTTP server libraries (opentelemetry_cowboy or opentelemetry_bandit) because Phoenix only handles part of the request lifecycle. The server library captures the full HTTP request/response cycle.
Setup
Initialize the telemetry handlers in your application's start/2 callback, before the supervisor starts:
defmodule MyApp.Application do
  use Application

  def start(_type, _args) do
    # Set up OpenTelemetry instrumentation
    :opentelemetry_cowboy.setup()
    OpentelemetryPhoenix.setup(adapter: :cowboy2)
    OpentelemetryEcto.setup([:my_app, :repo])

    children = [
      MyApp.Repo,
      {Phoenix.PubSub, name: MyApp.PubSub},
      MyAppWeb.Endpoint
    ]

    opts = [strategy: :one_for_one, name: MyApp.Supervisor]
    Supervisor.start_link(children, opts)
  end
end
If you're using Bandit instead of Cowboy, change the adapter:
OpentelemetryPhoenix.setup(adapter: :bandit)
Endpoint configuration
Ensure your endpoint.ex includes Plug.Telemetry so that endpoint calls are properly traced:
plug Plug.Telemetry, event_prefix: [:phoenix, :endpoint]
Configuration options
The OpentelemetryPhoenix.setup/1 function accepts these options:
| Option | Type | Default | Description |
|---|---|---|---|
adapter | :cowboy2 or :bandit | required | The Phoenix HTTP server adapter |
endpoint_prefix | list of atoms | [:phoenix, :endpoint] | The telemetry event prefix for your endpoint |
liveview | boolean | true | Whether to instrument LiveView events |
Span names
OpenTelemetry Phoenix generates spans with the following naming conventions:
| Component | Span Name Format | Example |
|---|---|---|
| HTTP request | "{METHOD} {route}" | GET /users/:id |
| LiveView mount | "{Module}.mount" | MyAppWeb.UserLive.mount |
| LiveView params | "{Module}.handle_params" | MyAppWeb.UserLive.handle_params |
| LiveView event | "{Module}.handle_event#{event}" | MyAppWeb.UserLive.handle_event#save |
| LiveComponent | "{Module}.handle_event#{event}" | MyAppWeb.UserForm.handle_event#validate |
Span attributes
Router dispatch spans include:
| Attribute | Description |
|---|---|
phoenix.plug | The plug module handling the request |
phoenix.action | The plug action/options |
http.route | The matched route pattern |
LiveView instrumentation
When liveview: true (the default), OpenTelemetry Phoenix automatically traces the following LiveView events:
mount- Initial LiveView mount and connected mounthandle_params- URL parameter changeshandle_event- User interactions (clicks, form submits)- LiveComponent
handle_event- Events on nested components
No additional code is needed. The instrumentation hooks into Phoenix telemetry events automatically.
Ecto instrumentation
To trace database queries, set up opentelemetry_ecto with your repo's telemetry prefix:
# For a repo named MyApp.Repo, the default prefix is [:my_app, :repo]
OpentelemetryEcto.setup([:my_app, :repo])
Each Ecto query creates a span with these attributes:
| Attribute | Description |
|---|---|
db.system | Database type (postgresql, mysql, sqlite) |
db.statement | SQL query text (disabled by default, see below) |
db.operation.name | SQL command (SELECT, INSERT, etc.) |
db.sql.table | Table name |
server.address | Database hostname |
Ecto options
OpentelemetryEcto.setup([:my_app, :repo],
  # Enable SQL statement capture (disabled by default)
  db_statement: :enabled,

  # Add custom attributes to all spans
  additional_attributes: %{environment: "production"},

  # Use a sanitizer function instead of :enabled for sensitive data
  # db_statement: &MyApp.Sanitizer.sanitize/1
)
Adding custom spans
Create custom spans within your controllers or LiveView handlers:
require OpenTelemetry.Tracer, as: Tracer

def show(conn, %{"id" => id}) do
  user = Tracer.with_span "fetch_user" do
    Tracer.set_attributes([{"user.id", id}])
    Accounts.get_user!(id)
  end

  render(conn, :show, user: user)
end
For LiveView:
def handle_event("save", %{"user" => params}, socket) do
  Tracer.with_span "save_user" do
    case Accounts.update_user(socket.assigns.user, params) do
      {:ok, user} ->
        {:noreply, assign(socket, :user, user)}

      {:error, changeset} ->
        Tracer.set_status(:error, "validation failed")
        {:noreply, assign(socket, :changeset, changeset)}
    end
  end
end
Exporter configuration
Configure the OTLP exporter in your config/runtime.exs:
config :opentelemetry,
  resource: %{
    "service.name" => "my-phoenix-app",
    "service.version" => "1.0.0"
  },
  span_processor: :batch,
  traces_exporter: :otlp

config :opentelemetry_exporter,
  otlp_protocol: :grpc,
  otlp_endpoint: System.get_env("OTEL_EXPORTER_OTLP_ENDPOINT", "http://localhost:4317"),
  otlp_headers: [
    {"uptrace-dsn", System.get_env("UPTRACE_DSN", "")}
  ]
What is Uptrace?
Uptrace is an OpenTelemetry APM that supports distributed tracing, metrics, and logs. You can use it to monitor applications and troubleshoot issues.
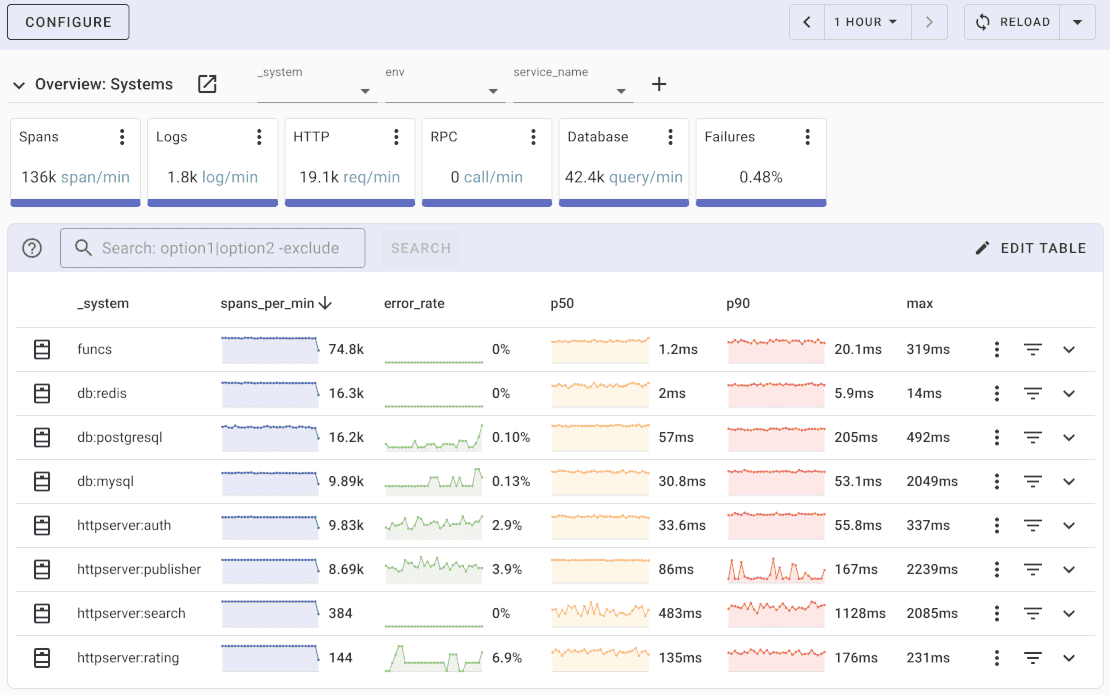
Uptrace comes with an intuitive query builder, rich dashboards, alerting rules with notifications, and integrations for most languages and frameworks.
Uptrace can process billions of spans and metrics on a single server and allows you to monitor your applications at 10x lower cost.
In just a few minutes, you can try Uptrace by visiting the cloud demo (no login required) or running it locally with Docker. The source code is available on GitHub.
FAQ
What packages do I need for Phoenix instrumentation? You need opentelemetry_phoenix for Phoenix-level tracing, plus either opentelemetry_cowboy or opentelemetry_bandit for HTTP server-level tracing. Add opentelemetry_ecto to also trace database queries.
Does OpenTelemetry Phoenix support LiveView? Yes, LiveView instrumentation is enabled by default. It traces mount, handle_params, and handle_event callbacks for both LiveView and LiveComponent modules.
Why do I need both opentelemetry_phoenix and opentelemetry_cowboy? Phoenix only handles part of the request lifecycle (routing, controllers). The HTTP server (Cowboy or Bandit) handles the full request/response cycle. You need both for complete request tracing.
How do I trace Ecto queries? Add opentelemetry_ecto to your dependencies and call OpentelemetryEcto.setup([:my_app, :repo]) in your application start. Queries automatically create spans with table names and timing. To include SQL statements, pass db_statement: :enabled.
Can I disable LiveView tracing? Yes, pass liveview: false to OpentelemetryPhoenix.setup/1 to skip LiveView instrumentation.
How do I add custom attributes to spans? Use OpenTelemetry.Tracer.set_attributes/1 within a span context to add custom key-value pairs. You can also use Tracer.with_span/2 to create custom spans with attributes.
What's next?
With OpenTelemetry Phoenix instrumentation in place, you can monitor request latency, trace LiveView interactions, and identify slow database queries.
Next steps to enhance your observability:
- Set up OpenTelemetry Erlang/Elixir for full SDK configuration
- Deploy the OpenTelemetry Collector for production environments
- Add Redis instrumentation if your app uses Redis
- Monitor your PostgreSQL or MySQL database