OpenTelemetry NestJS Instrumentation
OpenTelemetry NestJS instrumentation is a set of OpenTelemetry packages that automatically patches HTTP, Express, and NestJS-core layers at startup to collect traces, metrics, and logs. You configure a NodeSDK once, load it before NestJS bootstraps via --require, and gain full visibility into request latency, controller execution, database queries, and downstream service calls — without touching your business logic.
Quick Start
| Step | Action | Detail |
|---|---|---|
| 1. Install | Add OpenTelemetry packages | npm install @opentelemetry/sdk-node @opentelemetry/auto-instrumentations-node |
| 2. Configure | Create src/otel.ts | See Usage section below |
| 3. Run | Load with --require flag | node --require ./dist/otel.js dist/main.js |
| 4. Verify | Check traces in your backend | Spans appear automatically |
Minimal working example:
import { NodeSDK } from '@opentelemetry/sdk-node'
import { getNodeAutoInstrumentations } from '@opentelemetry/auto-instrumentations-node'

const sdk = new NodeSDK({
  serviceName: 'my-nestjs-app',
  instrumentations: [getNodeAutoInstrumentations()],
})
sdk.start()
This configuration automatically instruments NestJS controllers, HTTP requests, and common Node.js libraries without modifying your application code.
If getNodeAutoInstrumentations() generates too much noise (filesystem events in particular), disable specific instrumentations selectively:
getNodeAutoInstrumentations({
  // fs instrumentation is very noisy — disable unless you need it
  '@opentelemetry/instrumentation-fs': { enabled: false },
  // dns instrumentation rarely adds value in most apps
  '@opentelemetry/instrumentation-dns': { enabled: false },
})
What is NestJS?
NestJS is a progressive Node.js framework for building efficient and scalable server-side applications. It is written in TypeScript and combines elements of Object-Oriented Programming, Functional Programming, and Functional Reactive Programming.
NestJS uses decorators and a module system inspired by Angular, making it a popular choice for teams building enterprise-grade REST APIs, GraphQL services, and microservices on Node.js.
What is OpenTelemetry?
OpenTelemetry is an open-source observability framework that standardizes the collection, processing, and export of telemetry data from applications. It supports distributed tracing, metrics, and logs across multiple languages and platforms.
OpenTelemetry enables developers to instrument their code and export telemetry to any OpenTelemetry backend for analysis and visualization. The OpenTelemetry architecture follows a modular design with SDKs, APIs, and exporters as its core components.
Quick Start: For fastest setup without code changes, see the Node.js zero-code instrumentation guide.
Prerequisites
Before instrumenting, make sure your environment meets these requirements:
| Requirement | Version |
|---|---|
| Node.js | 18.19.0+ (Node.js 20+ required for NestJS 11+) |
| NestJS | 8+ |
| TypeScript | 4.7+ |
Node.js 18 reached end-of-life in March 2025. For new projects, use Node.js 20 or 22.
Note: The examples in this guide use Uptrace as the OpenTelemetry backend. You can use any OTLP-compatible backend — replace
OTEL_EXPORTER_OTLP_ENDPOINTandOTEL_EXPORTER_OTLP_HEADERSwith your backend's endpoint and credentials.
Zero-code instrumentation
If you want traces without touching your application code, use environment variables with the --require flag:
export OTEL_SERVICE_NAME=my-nestjs-app
export OTEL_TRACES_EXPORTER=otlp
export OTEL_METRICS_EXPORTER=otlp
export OTEL_EXPORTER_OTLP_ENDPOINT=https://api.uptrace.dev # endpoint is embedded in DSN
export OTEL_EXPORTER_OTLP_HEADERS=uptrace-dsn=https://<secret>@api.uptrace.dev
export OTEL_EXPORTER_OTLP_COMPRESSION=gzip

node --require @opentelemetry/auto-instrumentations-node/register dist/main.js
Or via NODE_OPTIONS in your Docker or CI environment:
NODE_OPTIONS="--require @opentelemetry/auto-instrumentations-node/register" node dist/main.js
This approach requires only one package:
npm install @opentelemetry/auto-instrumentations-node
For production setups that need custom processors, sampling logic, or explicit instrumentation control, use the code-based approach below.
NestJS instrumentation
NestJS runs on top of Express (or Fastify), so you need to install instrumentations for both the framework layer and the HTTP transport layer. The @opentelemetry/instrumentation-nestjs-core package instruments NestJS-specific components: controllers, guards, interceptors, and pipes.
Install the required packages:
# Using npm
npm install @opentelemetry/sdk-node \
  @opentelemetry/api \
  @opentelemetry/auto-instrumentations-node \
  @opentelemetry/instrumentation-nestjs-core \
  @opentelemetry/instrumentation-http \
  @opentelemetry/instrumentation-express

# Using yarn
yarn add @opentelemetry/sdk-node \
  @opentelemetry/api \
  @opentelemetry/auto-instrumentations-node \
  @opentelemetry/instrumentation-nestjs-core \
  @opentelemetry/instrumentation-http \
  @opentelemetry/instrumentation-express
If you prefer minimal explicit dependencies over the full auto-instrumentations-node bundle, you can install only what you need. The three packages above — instrumentation-nestjs-core, instrumentation-http, and instrumentation-express — cover the vast majority of production use cases.
Usage
After installing OpenTelemetry, configure the SDK to export data to an observability backend.
Create a dedicated file src/otel.ts:
import { BatchSpanProcessor } from '@opentelemetry/sdk-trace-base'
import { resourceFromAttributes } from '@opentelemetry/resources'
import { NodeSDK } from '@opentelemetry/sdk-node'
import { OTLPTraceExporter } from '@opentelemetry/exporter-trace-otlp-http'
import { PeriodicExportingMetricReader } from '@opentelemetry/sdk-metrics'
import { OTLPMetricExporter } from '@opentelemetry/exporter-metrics-otlp-http'
import { HttpInstrumentation } from '@opentelemetry/instrumentation-http'
import { ExpressInstrumentation } from '@opentelemetry/instrumentation-express'
import { NestInstrumentation } from '@opentelemetry/instrumentation-nestjs-core'

const dsn = process.env.UPTRACE_DSN
console.log('using dsn:', dsn)

const traceExporter = new OTLPTraceExporter({
  url: 'https://api.uptrace.dev/v1/traces',
  headers: { 'uptrace-dsn': dsn },
  compression: 'gzip' as any,
})

const sdk = new NodeSDK({
  spanProcessor: new BatchSpanProcessor(traceExporter, {
    maxExportBatchSize: 1000,
    maxQueueSize: 1000,
  }),
  resource: resourceFromAttributes({
    'service.name': 'my-nestjs-app',
    'service.version': '1.0.0',
    'deployment.environment': process.env.NODE_ENV || 'development',
  }),
  metricReader: new PeriodicExportingMetricReader({
    exporter: new OTLPMetricExporter({
      url: 'https://api.uptrace.dev/v1/metrics',
      headers: { 'uptrace-dsn': dsn },
    }),
    exportIntervalMillis: 15000,
  }),
  instrumentations: [
    new HttpInstrumentation(),
    new ExpressInstrumentation(),
    new NestInstrumentation(),
  ],
})

sdk.start()

process.on('SIGTERM', () => {
  sdk
    .shutdown()
    .then(() => console.log('OpenTelemetry SDK shut down'))
    .catch((err) => console.error('Error shutting down SDK', err))
    .finally(() => process.exit(0))
})
Note on Examples: This guide uses Uptrace as the OpenTelemetry backend in code examples. OpenTelemetry is vendor-neutral and works with any OTLP-compatible backend — Jaeger, Grafana Cloud, Honeycomb, and others. Replace
OTEL_EXPORTER_OTLP_ENDPOINTand theuptrace-dsnheader with your backend's endpoint and auth headers.
Critical: Initialization Order
The most common issue when setting up OpenTelemetry in NestJS is initialization order. The SDK must be started before NestJS imports any modules — otherwise, auto-instrumentation patches won't apply and you'll see incomplete or missing traces.
The correct approach is to load otel.ts via the --require flag before the application entry point:
# Development (ts-node)
ts-node --require ./src/otel.ts src/main.ts

# Production (compiled)
node --require ./dist/otel.js dist/main.js
Update your package.json scripts:
{
  "scripts": {
    "start": "node --require ./dist/otel.js dist/main.js",
    "start:dev": "ts-node --require ./src/otel.ts src/main.ts",
    "start:debug": "node --inspect --require ts-node/register --require ./src/otel.ts src/main.ts"
  }
}
Do not import otel.ts at the top of main.ts. While it may appear to work in development, it causes race conditions during module resolution and breaks instrumentation for lazily-loaded NestJS modules. The --require flag guarantees the SDK initializes before any application code runs.
Instrumentation Options
The NestInstrumentation class supports configuration options for customizing behavior:
| Option | Description |
|---|---|
enabled | Enable or disable the instrumentation entirely |
The HttpInstrumentation layer provides the main filtering options. Use ignoreIncomingRequestHook to exclude health check endpoints from traces:
import { HttpInstrumentation } from '@opentelemetry/instrumentation-http'

const httpInstrumentation = new HttpInstrumentation({
  ignoreIncomingRequestHook: (request) => {
    const ignorePatterns = ['/health', '/ready', '/metrics', '/favicon.ico']
    return ignorePatterns.some((pattern) => request.url?.includes(pattern))
  },
})
Semconv migration
Starting with @opentelemetry/instrumentation-nestjs-core v0.52.0, you can opt into the stable HTTP semantic conventions (v1.23.0) using an environment variable:
# Use stable HTTP semconv (recommended for new projects)
export OTEL_SEMCONV_STABILITY_OPT_IN=http

# Use both old and new semconv (for gradual migration)
export OTEL_SEMCONV_STABILITY_OPT_IN=http/dup
Without this variable set, the instrumentation defaults to the older v1.7.0 conventions.
Custom Spans
In addition to automatic instrumentation, you can create custom spans to trace specific operations inside your services:
import { Injectable } from '@nestjs/common'
import { trace, SpanStatusCode } from '@opentelemetry/api'

const tracer = trace.getTracer('my-nestjs-app')

@Injectable()
export class OrderService {
  async processOrder(orderId: string): Promise<Order> {
    return tracer.startActiveSpan('process-order', async (span) => {
      try {
        span.setAttribute('order.id', orderId)

        const order = await this.orderRepository.findOne(orderId)
        span.setAttribute('order.status', order.status)

        const result = await this.fulfillmentService.fulfill(order)
        span.setAttribute('order.fulfilled', true)

        return result
      } catch (error) {
        span.recordException(error)
        span.setStatus({ code: SpanStatusCode.ERROR, message: error.message })
        throw error
      } finally {
        span.end()
      }
    })
  }
}
Use startActiveSpan instead of startSpan when you need child spans to be automatically associated with the parent — it sets the span as active in the current context, so any downstream instrumentation (database calls, HTTP requests) will attach to it automatically.
Database Instrumentation
OpenTelemetry provides span-level visibility into every database query through dedicated instrumentation packages.
TypeORM
getNodeAutoInstrumentations() does not currently include TypeORM instrumentation. It still captures lower-level database spans for drivers such as pg and mysql, but if you want ORM-level TypeORM spans you need to install the package explicitly:
npm install @opentelemetry/instrumentation-typeorm
import { TypeormInstrumentation } from '@opentelemetry/instrumentation-typeorm'

const sdk = new NodeSDK({
  instrumentations: [
    new HttpInstrumentation(),
    new ExpressInstrumentation(),
    new NestInstrumentation(),
    new TypeormInstrumentation({
      enhancedDatabaseReporting: true, // include query params in span attributes
    }),
  ],
})
Each query produces a span with db.system.name, db.query.text, and db.operation.name attributes.
Prisma
Use the official @prisma/instrumentation package:
npm install @prisma/instrumentation
import { PrismaInstrumentation } from '@prisma/instrumentation'

const sdk = new NodeSDK({
  instrumentations: [
    new HttpInstrumentation(),
    new ExpressInstrumentation(),
    new NestInstrumentation(),
    new PrismaInstrumentation(),
  ],
})
Distributed Tracing and Context Propagation
When NestJS is part of a microservices architecture, context propagation carries trace context across service boundaries automatically. HttpInstrumentation injects W3C traceparent headers into every outgoing HTTP request and extracts them from incoming requests — no manual code required.
For NestJS microservices using gRPC, Kafka, or RabbitMQ, add the corresponding instrumentation package:
# gRPC
npm install @opentelemetry/instrumentation-grpc

# Kafka (kafkajs)
npm install @opentelemetry/instrumentation-kafkajs
import { GrpcInstrumentation } from '@opentelemetry/instrumentation-grpc'

const sdk = new NodeSDK({
  instrumentations: [
    new HttpInstrumentation(),
    new ExpressInstrumentation(),
    new NestInstrumentation(),
    new GrpcInstrumentation(),
  ],
})
With context propagation in place, a single trace links spans from the API gateway through NestJS controllers, downstream microservices, and database queries into one end-to-end view.
HTTP Metrics
OpenTelemetry automatically collects HTTP server metrics when metrics export is configured:
| Metric | Description |
|---|---|
http.server.request.duration | Duration of HTTP server requests (histogram) |
http.server.request.body.size | Size of HTTP server request bodies |
http.server.response.body.size | Size of HTTP server response bodies |
http.server.active_requests | Number of concurrent active requests |
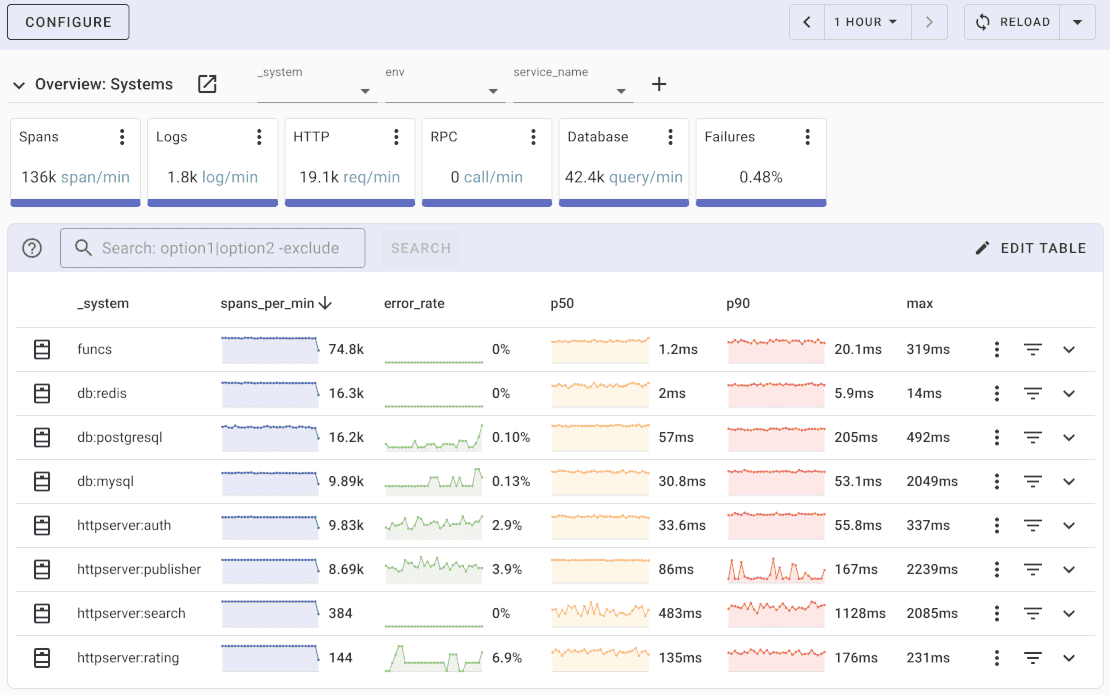
These metrics are emitted by HttpInstrumentation and available in your backend as soon as the PeriodicExportingMetricReader is configured. In Uptrace, they appear in the built-in HTTP dashboard under the service name.
For custom business metrics (counters, gauges, histograms), see the OpenTelemetry Metrics guide.
Production Configuration
Sampling
At full request volume, exporting 100% of traces is expensive. Configure a ratio-based sampler via environment variables — no code changes required:
OTEL_TRACES_SAMPLER=parentbased_traceidratio
OTEL_TRACES_SAMPLER_ARG=0.1
parentbased_traceidratio at 0.1 samples 10% of new root traces while respecting the sampling decision of upstream services. Adjust the ratio based on your request volume and cost. For a full explanation of sampler types, see the OpenTelemetry Sampling guide.
Or configure the sampler inline in otel.ts:
import { TraceIdRatioBasedSampler, ParentBasedSampler } from '@opentelemetry/sdk-trace-base'

const sdk = new NodeSDK({
  sampler: new ParentBasedSampler({
    root: new TraceIdRatioBasedSampler(
      process.env.NODE_ENV === 'production' ? 0.1 : 1.0
    ),
  }),
  // ... rest of config
})
Batch processor tuning
For high-throughput services, tune the BatchSpanProcessor to avoid queue overflow:
new BatchSpanProcessor(traceExporter, {
  maxExportBatchSize: 512,
  maxQueueSize: 2048,
  scheduledDelayMillis: 5000,
  exportTimeoutMillis: 30000,
})
Increase maxQueueSize if you see BatchSpanProcessor queue size limit reached in logs — this means spans are being dropped.
Deploying with Docker
Use the --require flag in your Dockerfile CMD to ensure the SDK initializes before NestJS:
FROM node:22-alpine AS builder
WORKDIR /app
COPY package*.json ./
RUN npm ci
COPY . .
RUN npm run build

FROM node:22-alpine AS runner
WORKDIR /app
ENV NODE_ENV=production
COPY --from=builder /app/node_modules ./node_modules
COPY --from=builder /app/dist ./dist
EXPOSE 3000
CMD ["node", "--require", "./dist/otel.js", "dist/main.js"]
Pass backend credentials at runtime so they stay out of the image:
# docker-compose.yml
services:
  api:
    build: .
    environment:
      - UPTRACE_DSN=https://<secret>@api.uptrace.dev
      - NODE_ENV=production
      - OTEL_TRACES_SAMPLER=parentbased_traceidratio
      - OTEL_TRACES_SAMPLER_ARG=0.1
    ports:
      - '3000:3000'
Troubleshooting
No traces appearing
Confirm you are using --require ./dist/otel.js and not importing otel.ts from inside main.ts. Add OTEL_LOG_LEVEL=debug to see SDK startup logs and verify the exporter endpoint is reachable.
Missing spans for controllers@opentelemetry/instrumentation-nestjs-core must be listed in the instrumentations array. If you use getNodeAutoInstrumentations(), it is included automatically. Confirm the package version is ≥ 0.40.0.
Incomplete traces across services
If child spans from downstream services appear as separate traces, context propagation is broken. Verify both services have HttpInstrumentation configured and that the upstream service injects traceparent headers into outgoing requests.
High memory usage
Reduce maxQueueSize in BatchSpanProcessor or lower the sampling rate. The default queue holds up to 2048 spans in memory; at high request volumes this can accumulate if the exporter is slow.
Fastify adapter@opentelemetry/instrumentation-fastify was removed from auto-instrumentations-node in March 2026. Use @fastify/otel — the official Fastify OpenTelemetry plugin — instead. @opentelemetry/instrumentation-nestjs-core works with both adapters.
What is Uptrace?
Uptrace is an OpenTelemetry APM that supports distributed tracing, metrics, and logs. You can use it to monitor applications and troubleshoot issues. For Node.js instrumentation, see the OpenTelemetry JavaScript guide.
Uptrace comes with an intuitive query builder, rich dashboards, alerting rules with notifications, and integrations for most languages and frameworks.
Uptrace can process billions of spans and metrics on a single server and allows you to monitor your applications at 10x lower cost.
In just a few minutes, you can try Uptrace by visiting the cloud demo (no login required) or running it locally with Docker. The source code is available on GitHub.
FAQ
What does @opentelemetry/instrumentation-nestjs-core instrument?
It instruments NestJS-specific application layers: the NestFactory.create bootstrap call, controller method handlers, and the full request context lifecycle. For HTTP transport (request/response, status codes, headers), you still need @opentelemetry/instrumentation-http and @opentelemetry/instrumentation-express.
Why are my traces missing or incomplete?
The most likely cause is initialization order. OpenTelemetry must be loaded before NestJS bootstraps. Move your sdk.start() call to a separate otel.ts file and load it with --require ./otel.js instead of importing it at the top of main.ts. See the Critical: Initialization Order section for details.
Does this work with NestJS on Fastify?
Yes, but replace @opentelemetry/instrumentation-express with @fastify/otel — the official Fastify OpenTelemetry plugin. The @opentelemetry/instrumentation-fastify package was removed from auto-instrumentations-node in March 2026. The @opentelemetry/instrumentation-nestjs-core package works with both adapters.
Does OpenTelemetry work with NestJS microservices?
Yes. OpenTelemetry instruments the transport layer, so gRPC, Kafka, RabbitMQ, and Redis-based microservices are covered by their respective instrumentation packages (@opentelemetry/instrumentation-grpc, @opentelemetry/instrumentation-kafkajs, etc.). Context propagation across microservice boundaries works automatically as long as the receiving service also runs OTel instrumentation.
How do I trace TypeORM or Prisma database queries?
Use @opentelemetry/instrumentation-typeorm for TypeORM or @prisma/instrumentation for Prisma. Both can be added to the instrumentations array in your SDK configuration. getNodeAutoInstrumentations() does not currently include TypeORM, so install it explicitly if you want ORM-level spans.
What is the performance overhead of OpenTelemetry in production?
With BatchSpanProcessor and a reasonable sampling rate, the overhead is typically under 3-5% for most NestJS applications. The batch processor buffers spans in memory and exports them asynchronously, minimizing impact on request latency. For high-traffic services, configure head-based sampling using OTEL_TRACES_SAMPLER=parentbased_traceidratio and OTEL_TRACES_SAMPLER_ARG=0.1 to sample 10% of traces.
Can I use OpenTelemetry with NestJS and GraphQL?
Yes. Add @opentelemetry/instrumentation-graphql to your SDK configuration. It traces resolver execution, query parsing, and validation. Each GraphQL operation appears as a span with graphql.operation.type and graphql.operation.name attributes.
What's Next?
With NestJS instrumented, connect it to the rest of your stack for end-to-end visibility:
- Express services: OpenTelemetry Express guide for other Node.js services in the same stack
- Frontend: OpenTelemetry JavaScript browser instrumentation to track sessions end-to-end
- Sampling: OpenTelemetry Sampling for production cost control
- Context propagation: OpenTelemetry context propagation for microservice architectures